Selecteer het soort probleem om oplossingen te vinden


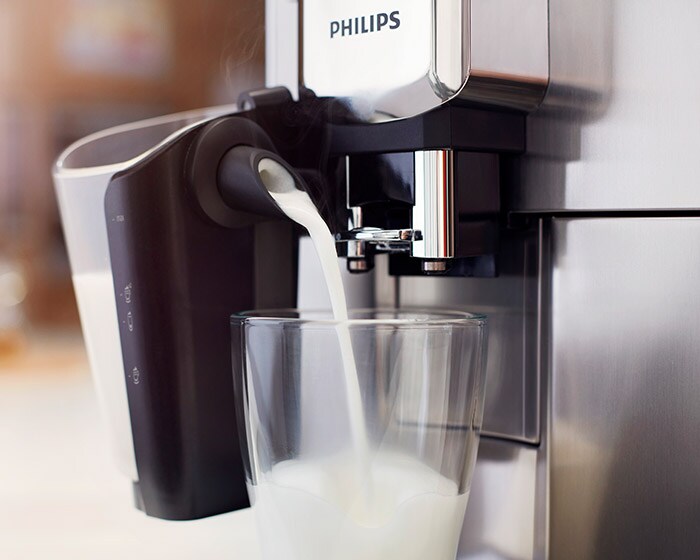
LatteGo
Een aantal veelgestelde vragen over ons LatteGo-melksysteem
Dit probleem kan twee oorzaken hebben:
1. U hebt de twee delen van de LatteGo niet correct in elkaar gezet
Er kan melk uit het gat in de onderkant van de Philips LatteGo-melkopschuimer lekken als u de twee delen niet correct in elkaar hebt gezet. Sluit de twee delen op elkaar aan totdat u een **klik** hoort. Het kan zijn dat u hierbij wat kracht moet zetten.
2. U hebt de transportklem van de LatteGo niet verwijderd
Wanneer u de LatteGo uitpakt, moet u de transportklem verwijderen voordat u de melkopschuimer kunt gebruiken.
Door het kleine gaatje in de onderkant kan de melk in de melkopschuimkamer stromen. De melk stroomt door het kanaal dat wordt gecreëerd door het melkreservoir en het zegel op de behuizing van de LatteGo.
Het is normaal dat er na gebruik melk achterblijft in het melkreservoir. Dit is nodig om voor een perfect schuimresultaat te zorgen en om te voorkomen dat er aan het eind van het melkopschuimproces lucht bij komt.
Controleer de volgende dingen als er meer melk in het melkreservoir achterblijft dan gewoonlijk.
1. Hebt u via de memo-functie de hoeveelheid melk aangepast?
Als dit het geval is, kunt u niet uitgaan van de indicaties op de behuizing omdat u de benodigde hoeveelheid melk voor uw drankjes hebt aangepast.
2. Als u de hoeveelheid melk niet via de memo-functie hebt aangepast
Er is meer melk in het melkreservoir achtergebleven na het melkopschuimproces omdat u het reservoir verder hebt gevuld dan nodig was voor het drankje. Zorg ervoor dat u het melkreservoir vult tot aan het benodigde niveau voor één of twee kopjes cappuccino of latte macchiato.
De LatteGo kan alleen worden gebruikt op de machines waarbij deze wordt verkocht en is niet verwisselbaar met andere melkopschuimsystemen.
Ik kan de zetgroep niet verwijderen
Als je de zetgroep niet kunt verwijderen, staat de machine niet in de neutrale stand. Volg de stappen hieronder en bekijk de ondersteuningsfilm* voor meer gedetailleerde instructies. 1. Plaats de koffiediklade en lekbak terug in de machine en sluit de servicedeur. 2. Druk op de aan-uitknop om de machine uit te schakelen. Wacht tot de machine volledig is uitgeschakeld en je geen geluiden meer hoort. 3. Zet de hoofdschakelaar achter op de machine in de uit-stand (0). Als er geen hoofdschakelaar is, haal je de stekker van de machine uit het stopcontact. 4. Zet de hoofdschakelaar achter op de machine in de aan-stand (-). Als er geen hoofdschakelaar is, steek je de stekker van de machine weer in het stopcontact. 5. Druk op de aan-uitknop om de machine weer in te schakelen. Wacht tot de machine volledig is ingeschakeld en je geen geluiden meer hoort. Opmerking: voer geen handelingen uit zoals de servicedeur openen/de lekbak of koffiediklade verwijderen, voordat de machine klaar is voor gebruik. 6. Verwijder de koffiediklade en lekbak en open de servicedeur. 7. Probeer opnieuw de zetgroep te verwijderen. Duw het handvat naar de zijkant, houd het vast en trek de zetgroep naar je toe. Verwijder de zetgroep nooit tijdens het ontkalken. Wacht altijd eerst tot het ontkalkingsproces is afgelopen. *De ondersteuningsfilm is van toepassing op alle volautomatische espressomachines, niet alleen op de genoemde modellen.
Philips 2200 Series
Philips 2200 Series LatteGo
Philips 3200 Series
Philips 3200 Series LatteGo
Was dit nuttige informatie?
Ik kan de zetgroep niet plaatsen
Als je de zetgroep niet kunt plaatsen, staan de machine en zetgroep niet in de neutrale stand. Volg de stappen hieronder en bekijk de ondersteuningsfilm* voor meer gedetailleerde instructies. 1. Plaats de koffiediklade en de lekbak terug en sluit de servicedeur, laat de zetgroep uit de machine. 2. Druk op de aan-uitknop om de machine uit te schakelen. Wacht tot de machine volledig is uitgeschakeld en je geen geluiden meer hoort. 3. Zet de hoofdschakelaar achter op de machine in de uit-stand (0). Als er geen hoofdschakelaar is, haal je de stekker van de machine uit het stopcontact. 4. Zet de hoofdschakelaar achter op de machine in de aan-stand (-). Als er geen hoofdschakelaar is, plaats je de stekker van de machine weer in het stopcontact. 5. Druk op de aan-uitknop om de machine weer in te schakelen. Wacht tot de machine volledig is ingeschakeld en je geen geluiden meer hoort. 6. Zet de zetgroep in de neutrale stand, zoals weergegeven in de ondersteuningsfilm. Als je dit niet doet, kun je de zetgroep niet plaatsen. 7. Verwijder de koffiediklade en lekbak, open de servicedeur en schuif de zetgroep terug via de rail. Druk niet op de knop wanneer je de zetgroep plaatst. 8. Plaats de koffiediklade en lekbak terug in de machine en sluit de servicedeur. *De ondersteuningsfilm is van toepassing op alle volautomatische espressomachines, niet alleen op de genoemde modellen.
Philips 2200 Series
Philips 2200 Series LatteGo
Philips 3200 Series
Philips 3200 Series LatteGo
Was dit nuttige informatie?
Waarom schuimt de melkbeker de melk niet op?
Als de melkbeker de melk niet opschuimt, zijn er verschillende mogelijke oorzaken en oplossingen.
1. De onderdelen van de melkbeker zijn vuil.
2. De tuit van de melkbeker is niet volledig uitgetrokken.
• Controleer of de tuit volledig is uitgetrokken.
3. De melkslang is niet goed aangesloten op het opschuimelement.
• Maak de melkslang goed vast aan het opschuimelement.
4. Je gebruikt niet de juiste soort melk.
Was dit nuttige informatie?
De machine maakt lawaai
Het is normaal dat je geluiden hoort wanneer je de espressomachine gebruikt. Als je ongewone geluiden hoort, kun je hier lezen waar dat aan te wijten is en hoe je dat oplost. Het filter is vóór installatie niet goed voorbereid of is mogelijk verstopt. Schakel de machine uit. Verwijder het filter en probeer opnieuw koffie te zetten. Als dit lukt, dien je het filter goed voor te bereiden voordat je het terugplaatst. Bekijk de film over het voorbereiden van het AquaClean-filter. Plaats het voorbereide filter terug en zet koffie. Als het probleem hiermee nog steeds niet is opgelost, is het filter mogelijk verstopt en moet het worden vervangen.
Lawaai tijdens het malen is mogelijk te wijten aan:
1. Een verstopte koffietrechter.
Misschien kun je het probleem oplossen door de koffietrechter te ontstoppen. Volg de stappen in de ondersteuningsfilm* over het reinigen van de machine.
2. De maling is ingesteld op de fijnste maling.
Zet de maalstand op een grovere maling. Volg de stappen in de ondersteuningsfilm* over het eerste gebruik van de machine en over het aanpassen van instellingen.
Lawaai tijdens het spoelen of koffiezetten is mogelijk te wijten aan:
1. Er zitten koffiebonen/-deeltjes vast onder het waterreservoir en er wordt lucht aangezogen
Verwijder het waterreservoir en verwijder eventuele bonen/deeltjes uit het waterreservoircompartiment. Volg de stappen in de ondersteuningsfilm* over reinigen.
2. De zetgroep zit verstopt of is niet goed gesmeerd
Verwijder de zetgroep en spoel deze onder de kraan af. Smeer de zetgroep indien nodig. Volg de stappen in de ondersteuningsfilm* over reinigen en over het plaatsen en verwijderen van de zetgroep.
3. De machine moet worden ontkalkt.
Als je de machine al een tijd niet hebt ontkalkt of de ontkalkingsbeurt meermalen hebt uitgesteld, is het nu tijd om de machine te ontkalken. Ontkalk de machine alleen met het Philips/Saeco-ontkalkingsmiddel. Op de ontkalkingspagina vind je de juiste instructies voor je machine.
4. Wanneer je een AquaClean/Brita-filter gebruikt
*De ondersteuningsfilm is van toepassing op alle volautomatische espressomachines, niet alleen op de genoemde modellen.
AquaClean-filter voorbereiden
Was dit nuttige informatie?
Servicesleutel/foutcode 1, 3, 4, 5, 14 of 19 wordt op het display weergegeven
Als servicesleutel/foutcode 1, 3, 4, 5, 14 of 19 verschijnt, kan de machine niet meer worden gebruikt. Aan de hand van de ondersteuningsfilms* kun je het probleem oplossen. Als een andere code verschijnt, kun je het beste contact opnemen met de klantondersteuning.
Servicesleutel/foutcode 1 Dit geeft aan dat de koffietrechter verstop zit met resten gemalen koffie. Misschien kun je het probleem oplossen door de koffietrechter te ontstoppen. Volg de stappen in de ondersteuningsfilm. 1. Schakel de machine uit. 2. Verwijder de zetgroep. 3. Plaats de steel van een lepel in de koffietrechter en ontstop de trechter. 4. Plaats de zetgroep terug. 5. Zet de machine weer aan. 6. Zet de maalstand op een grovere maling. *De ondersteuningsfilm is van toepassing op alle volautomatische espressomachines, niet alleen op de modellen die in de titel zijn vermeld.
Servicesleutel/foutcode 3/4 TDe zetgroep zit verstopt, is niet goed gesmeerd of zit niet goed op zijn plaats. Volg de stappen in de ondersteuningsfilm* om het probleem op te lossen. 1. Schakel de machine uit. 2. Verwijder de zetgroep en spoel deze onder de kraan af. 3. Smeer de zetgroep volgens de instructies in de ondersteuningsfilm. 4. Plaats de zetgroep terug en zorg dat deze goed vastzit. Bij juiste plaatsing klikt de zetgroep vast. 5. Schakel het apparaat weer in. *De ondersteuningsfilm is van toepassing op alle volautomatische espressomachines, niet alleen op de modellen die in de titel zijn vermeld.
Servicesleutel/foutcode 5 Aangezien er verschillende oorzaken kunnen zijn, biedt een van de volgende oplossingen mogelijk uitkomst voor jouw probleem. In de ondersteuningsfilm* worden meer gedetailleerde instructies gegeven. 1. Er zit lucht in de waterleidingen of er zitten koffiebonen klem onder het waterreservoir.
Schakel de machine uit. Verwijder het water en controleer of het waterreservoircompartiment schoon en vrij van koffiebonen/-deeltjes is. Zet de machine vervolgens weer aan. Probeer 2-3 kopjes heet water af te tappen.
2. Wanneer je een AquaClean/Brita-filter gebruikt
Het filter is vóór installatie niet goed voorbereid of is verstopt.
Schakel de machine uit. Verwijder het filter en probeer opnieuw koffie te zetten. Als dit lukt, dien je het waterfilter goed voor te bereiden voordat je het terugplaatst. Plaats het voorbereide filter terug. Als het probleem hiermee nog steeds niet is opgelost, is het filter mogelijk verstopt en moet het worden vervangen.
3. De zetgroep zit verstopt.
Schakel de machine uit. Verwijder de zetgroep en spoel deze onder de kraan af. Smeer de zetgroep indien nodig. Plaats de zetgroep terug en zet de machine weer aan.
4. Er zitten kalkdeeltjes in de waterleidingen, waardoor deze verstopt zijn.
Laat de machine enkele uren uitgeschakeld. Zet de machine weer aan. Als de foutcode is verdwenen, ontkalk je de machine. Gebruik hiervoor alleen het Philips/Saeco-ontkalkingsproduct. In de sectie over ontkalken vind je de juiste instructies voor je machine.
*De ondersteuningsfilm is van toepassing op alle volautomatische espressomachines, niet alleen op de genoemde modellen.
Servicesleutel/foutcode 14 De machine is oververhit. Laat de machine 60 minuten uitgeschakeld.
Servicesleutel/foutcode 19
Ondersteuningsfilm voor foutcode 1
Ondersteuningsfilm voor foutcode 3/4
Ondersteuningsfilm voor foutcode 5
Was dit nuttige informatie?
The ‘empty coffee grounds container’ message does not disappear
If the coffee grounds container is emptied while the machine is switched off, the coffee cycle counter is not reset and the ‘empty coffee grounds container’ message does not disappear. Or the machine prompts the signal even though it is not full yet.
To make the message disappear:
• Remove the coffee grounds container while the machine is switched on, wait at least 5 seconds and then reinsert it.
• The support movie is applicable for all Full Automatic Espresso machines, not only the mentioned models in the title.
Was this information useful?
The descaling light does not go off after descaling
If the descaling light is still on then most probably you have not rinsed the machine with sufficient water after the descaling cycle was completed.
Rinse your machine using another full tank of water.
If you stopped the descaling procedure by switching off your machine and you don’t know how to resume, please contact our Consumer Care Center for assistance.
Was this information useful?
I don’t understand the meaning of the light signals on my espresso machine
The lights on your espresso machine give you information on what to do as well as on the status of your machine.
The user manual contains a dedicated chapter on the meaning of the lights. Use the search function to locate and download the appropriate user manual for your Philips or Saeco espresso machine.
Note: If all lights are blinking simultaneously, please contact our Consumer Care Centre for assistance.
Zoeken op productnummer.
We hebben {number} product(en) gevonden die verkrijgbaar zijn buiten uw land. Lokale promoties zijn mogelijk niet van toepassing.
Producten weergevenGevonden {number} producten
Uw model is gevonden, maar...
Dit product is niet beschikbaar in uw land, maar we hebben er een gevonden in een ander land
Selecteer uw model op basis van de laatste 2 cijfers van uw productnummer dat in blauw wordt weergegeven.
Found your model!
foundation-catalog.se01c-prx-search.search-sub-heading7
foundation-catalog.se01c-prx-search.search-sub-heading8
If this is the correct one, please select it below. Otherwise, search again.
Productafbeelding
Productbeschrijving
Modelnummer
Was this information useful?
The coffee machine brews watery coffee
If your coffee is too watery, there can be various causes and solutions. Discover here what could cause this and how to easily resolve it. 1. During first time use It is normal that the first brewed cups can be watery as the Saeco adapting system is still adjusting. Brew 5-7 more cups of coffee. 2. The brew group is clogged by dirt or not well greased Remove the brew group and rinse it under the tap, grease if needed. Follow the steps in the support movie* how to clean for cleaning instructions and how to insert and remove the brew group. 3. The coffee length was adjusted with the MEMO function Adjust the coffee length of the coffee button. Press and hold the appropriate button until the display shows the 'Memo' icon. Your machine enters the programming phase and starts to brew the selected coffee. Follow the steps in the support movie* first time use and how to customize settings. 4. The coffee funnel is blocked by ground coffee Unblocking the coffee funnel might solve the problem. Follow the steps in the support movie* how to clean. 5. The grind setting is set to a course grind Adjust the grind setting to a finer grind. Follow the steps in the support movie* first time use and how to customize settings. *The support movie is applicable for all Full Automatic Espresso machines, not only the mentioned models in the title.
How to rinse the brew group
How to unblock the coffee funnel
Was this information useful?
Only a few drops of coffee are being dispensed
If only a few drops of coffee are being dispensed, there can be various causes and solutions. Discover here what could cause this and how to easily resolve it. 1. The brew group is clogged by dirt or not well greased Remove the brew group and rinse it under the tap, grease if needed. Follow the support movies* for support movie* how to clean for cleaning/greasing instructions and how to insert and remove the brew group. 2. The coffee spout is clogged. Try carefully to unclog the coffee spout holes with a needle. 3. When using an AquaClean/Brita filter The filter was not prepared properly before installation or might be clogged. Switch off the machine. Remove the filter and try again to brew a coffee. If this works, make sure the filter is prepared properly before placing it back, see movie how to prepair the AquaClean filter. Place back the prepared filter and brew a coffee. If this still does not work the filter might be clogged and needs to be replaced. 4. The machine needs to be descaled. If you have not descaled the machine in a while or postponed it a few times, it is now time to descale the machine. Only descale the machine with the Philips/Saeco decalcifier. On the descaling page you can find the correct instructions for your machine. 5. For Exprelia or Xelsis machines. The SBS knob is closed. Turn the SBS knob to the middle position and brew an espresso. 6. Dispense hot water There might be air in the system. This can be removed by dispensing some hot water from the machine. *The support movie is applicable for all Full Automatic Espresso machines, not only the mentioned models.
How to rinse the brew group
How to grease the brew group
How to prepare the AquaClean filter
Was this information useful?
No coffee or water is being dispensed
As there can be different causes, one of the following solutions might work for you. The support movie* shows more detailed instructions.
1. During first time use
It is normal that the first brewed cups can be watery as the Saeco adapting system is still adjusting. Brew 5-7 more cups of coffee.
2. Coffee beans/particles trapped under the water tank and air is drawn
Remove the water tank and remove any beans/bean particles located in the water tank compartment area. Follow the steps in the support movie* how to clean.
3. The brew group is clogged by dirt
Remove the brew group and rinse it under the tap, grease if needed. Follow the steps in the support movie* how to clean for cleaning instructions and how to insert and remove the brew group.
4. When using an AquaClean/Brita filter.
The filter was not prepared properly before installation or might be clogged.
Remove the filter and try again to brew a coffee. If this works, make sure the filter is prepared properly before placing it back, see movie how to prepair the AquaClean filter. Place back the prepared filter and brew a coffee. If this still does not work the filter might be clogged and needs to be replaced.
5. There is air in the water circuit
Try to dispense 2-3 cups of hot water.
6. For Exprelia or Xelsis machines.
The SBS knob is closed. Turn the SBS knob to the middle position and brew an espresso.
7. The machine needs to be descaled.
If you have not descaled the machine in a while or postponed it a few times, it is now time to descale the machine. Only descale the machine with the Philips/Saeco decalcifier. On the descaling page you can find the correct instructions for your machine.
*The support movie is applicable for all Full Automatic Espresso machines, not only the mentioned models.
Support movie
Was this information useful?
The machine seems to be leaking
Water under your machine can have multiple causes, it does not directly indicates a technical default. Find out more in the information below and support movie* that shows more detailed instructions. Water in the drip tray If you see water in the drip tray do not worry, it's perfectly normal: This is water from the self-rinsing cycles made by the machine during use, which end up directly in the drip tray. This is not a leakage of the machine. Brownish water / water containing coffee particles If the water under the machine is brownish or contains coffee parts, make sure it is not caused by an overflown drip tray, spillage, removing the drip tray during use or a clogged brew group/residue drawer. To prevent/solve this: - Empty the drip tray when the 'drip tray full indicator’ pops up through the drip tray cover - Before you start descaling the machine, make sure that the drip tray is empty - The machine is placed on a horizontal surface - Remove the brew group and coffee residue drawer and rinse them under the tap. Clear water under the machine If the water tank is placed in the front of the machine, the water tank might not be fully inserted, make sure you push it to the back as far as possible. If this does not solve the problem, please contact the customer support in your country there might be a leakage. Coffee / water is leaking behind the coffee spout If you have a removable coffee spout, make sure it is placed in the correct position. Push the coffee spout a bit more towards the machine, this might help to solve the problem. If the coffee spout on your machine is not removable, please contact the customer support in your country there might be a leakage. *The support movie is applicable for all Full Automatic Espresso machines, not only the mentioned models in the text.
Was this information useful?
The machine is not grinding the coffee beans
The coffee funnel is blocked by ground coffee. Unblocking the coffee funnel might solve the problem. Follow the steps in the support movie*. 1. Switch off the machine. 2. Remove the brew group. 3. Insert a spoon handle into the coffee funnel and unblock it. 4. Place back the brew group. 5. Switch the machine on again. 6. Change the grind setting to a courser grind. *The support movie is applicable for all Full Automatic Espresso machines, not only the mentioned models in the title.
Support movie
Was this information useful?
The machine will not switch on
If your espresso machine does not switch on when you press the power button, there can be various causes and solutions. 1. Check the power cord and switch on the back 2. Connect to an another power socket Check if there are too many appliances connected to the power supply group. Try to connect the machine to another power socket.
Was this information useful?